Now
this bread was fun! Very different to all the types of other breads
that's been in the book so far and from this recipe onward it gets
more difficult and more unusual so the next few weekends will be
interesting!
After
all that spill about how different this recipe is – it starts the
same as usual but you can't help that though – it needs to be done
and this is how it is! Mixing the ingredients with your fingers
again, my favourite part, I really don't know why, I just love it!
Then time to knead which I let my sister, Alice try to do and she was
surprised how tough it was! So not just me! After kneading between
the both of us, it was time to leave it to rise!


After
the epic rise of the Maneesh dough, I expected great things from this
one too but alas, it wasn't as epic! I'm going to blame Alice's
kneading for this! Anyway so once this has risen, you divide the
dough into 12 equal pieces and roll them into a ball – no need to
leave them to prove again so this makes the process a lot shorter!
Once
all the divided dough are in balls, time to add the Stilton and the
grapes! I had the cheese crumbled and the grapes chopped in half
already to go so all I had to do was make a dent into the dough and
put both ingredients inside and then pinch the dough together –
nice and easy!
The
next part was really fun! So the cheese and grapes are in the balls
of dough so next I had to roll these out with a rolling pin - very
interesting! As soon as you roll them out you get sprayed with grape
juice! I also had some trouble with grapes escaping from the dough!
They do get very wet because of this and in the book it advises to
lightly dust with flour.
Like I
said, no need to wait for these to prove, time to fry them! On a hot
pan with a little olive oil and fry both sides for around 2 minutes.
The smell of cheese is just so strong from them and there were a few
leakages but I guessed that was always going to happen. I think I
should of rolled these out bigger than I did them but I don't think
this added to much different to the end result just a lesson learnt
for next time!

Reviews?
My Dad can't eat them as he is allergic to Stilton, Alice doesn't
like the cheese in general, to be fair a lot of people are not keen on this type
of cheese! But Mum and AJ liked it, I tried a little bit, it has a
nice taste to it – I didn't try a lot though as I'm not the biggest
fan of cheese!
To
watch how to make this properly, see this link! I wish I had seen
this before I made them! http://www.youtube.com/watch?v=-ylQ9SLVjcI
Tomorrow
night on BBC2 at 8.30pm, Paul Hollywood's Bread series finally
starts! I'm so excited to watch this! There will be a lot of the
recipes of his that I have already done and some that I haven't
reached yet so looking forward to seeing how it's done properly and
what to look out for in the future! Make sure you tune in!
Manessh,
have you ever heard of it? It's origins come from the Middle East. I
wasn't sure what favour to expect...
It
begins with the usual technique of mixing all the ingredients with
your fingers, I love this part! Then time to knead for 10 minutes,
I'm starting to get use to this now! I have to say, this is probably
the best the dough has ever risen! It was nearly coming out of the
bowl, I was amazed! Not sure what I done so differently but wow, I
hope it comes out like this every time from now on!

Time
to knock out the air of the dough, I think I really need to improve
on this part! It comes out in an odd texture for me, not too sure
why! The dough is then divided into three pieces and then I can't
remember if I used a rolling pin or if this was stretched by hand,
sorry!

In
between waiting for the bread to rise for 20 minutes, it's time to
make the Za'atar paste for on
top of the bread. There are a few different recipes for this over the
internet, some have completely different ingredients but all of them
have the same three main components – sesame seeds, dried thyme and
dried marjoram. These three ingredients get mixed with a little olive
oil until it becomes a paste.
Once
the bread has been left, you have to drizzle it with a touch of olive
oil and then brush the paste evenly across – though I added a bit
too much paste on the bread and it was very thick!
This
recipe makes 3 round breads, the first two I over baked as I always
worry that it won't be cooked enough inside and then the last one I
left to bake for the amount of time suggested (15 minutes) and it
came out fine! It's not that I don't trust the recipe of course, it's
our oven I worry about!
Reviews?
My mum liked it, I didn't mind it but no one had the chance to try it
really as I threw the rest away as I didn't think anyone else wanted
to try it – oops! Oh, and I gave one to AJ and she seemed to like
it too!
After
this recipe we get onto harder breads! But very different to what
I've been baking at the moment so that will be exciting! It's a
little worrying too as I haven't even come close to mastering the
previous breads yet!
Again,
my hand mixer came out but the mixer is a lot easier to use when
there is olive oil in the mixture and the dough comes out lovely and
smoother than usual! And then the fun part – adding the olives! I
think you were meant to mix these in by the mixer but I decided to do
it by hand as I thought it would be easier. But now when I look back
at the finish product I should have used the mixer to break them up a
bit! Next time!

Then
time to use the square container for it to rise in and and it raised
a lot more than I thought they would as like with the previous bread,
I was worried the olives might bring it down but it came out so nice!
It was then time to carefully take out the dough to make sure you
keep enough air in it as possible.

It was
hard to tell when the bread was baked (the recipe said 15-20 mins) as
even though the olives were well drained you could hear the sizzle
from the juice in the bread, this also made me worry it would come
out soggy – but it didn't! I'm not a fan of olives but it did look
and smell yummy!
Reviews?
So I think my aunt is quite the fan! She loved them, she dipped them
in balsamic vinegar – sounds nice! Gina loved them, all gone now I
believe! Think I will be making these again...
Favoured
bread number 2!
So I
had to revert back to using the hand mixer again, perfect for cakes
but not for bread. This time it nearly died on me, I was so worried I
could smell burning especially the way the dough kept working it's
way up to the top so I had to keep stopping but I'm starting to
learn to deal with it!
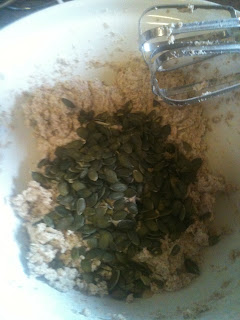
Anyway
at the mixing stage its 3 different types of flour, strong white,
wholemeal and malt flour and mix for a good six or so minutes and
afterwards add the pumpkin seeds and mix for a further 2 minutes.
Which again with the seeds was an added stress on my poor mixer!
You
then leave to rise, which I thought wouldn't be too much as I thought
the seeds would of make it heavy but it really does, better than some
of the other doughs I have done!

It's odd because so far with the doughs you use with the mixture you don't
have to knock the air out of them but with this recipe you did! And
it felt funny with all the seeds in them! Another thing that was done
differently is once divided brush with water and then roll in the
poppy seeds, which was fun! Then left to prove :)
This
bake came out like beasts!! The recipe says it only makes 10 so
that's what I divided the mixture but aren't they huge? Not very
bread stick like at all but I suppose it doesn't matter if they taste
nice, right?
Reviews?
Everyone really liked them, they came out huge though! They wasn't
too heavy either, maybe my little mixer is better than me after all!
Well,
finally onto the next chapter – Favoured Breads! At the moment I'm
ahead of schedule but with the return of F1 approaching and weekend
commitments throughout the year, I'm taking this as a good thing
especially since the breads get more complicated so I think I'll only
be able to manage 1 a week, hopefully 2! There are a lot of
interesting recipes I'm looking forward to making, such as the
breakfast rolls – I might get up stupidly early to do them!
Anyway,
onto our first favoured bread, nothing too complicated to start me
off with, these were very much like the Fougasse which like this
bread, is also French!
We
still with pretty much the same recipe and having to use my hand
mixer as a substitute for a proper dough mixer but it does the job no
matter how many times I have to keep stopping and starting to pull
the dough off when it becomes stuck at the top, boo!


The
mixture then goes into a square container to give it a good shape
when it has risen. I have to say I'm always surprised when it comes
out in the square shape perfectly, especially when it's such a sticky
wet mixture.

 You
then divide your perfectly shaped dough into strips and sprinkle the
oil and leave to prove for a little while. Once this process is done,
BAKE! :)
You
then divide your perfectly shaped dough into strips and sprinkle the
oil and leave to prove for a little while. Once this process is done,
BAKE! :)

Reviews? They liked it, I made so much bread by this point I think everyone was fed up of it but I think I'd rather make the Fougasse over this again though.
Sorry
this hasn't been a very interesting blog, I'm trying to write it from
memory from 2 weeks ago! But it is very similar to other recipes so
hopefully I didn't miss out too much!
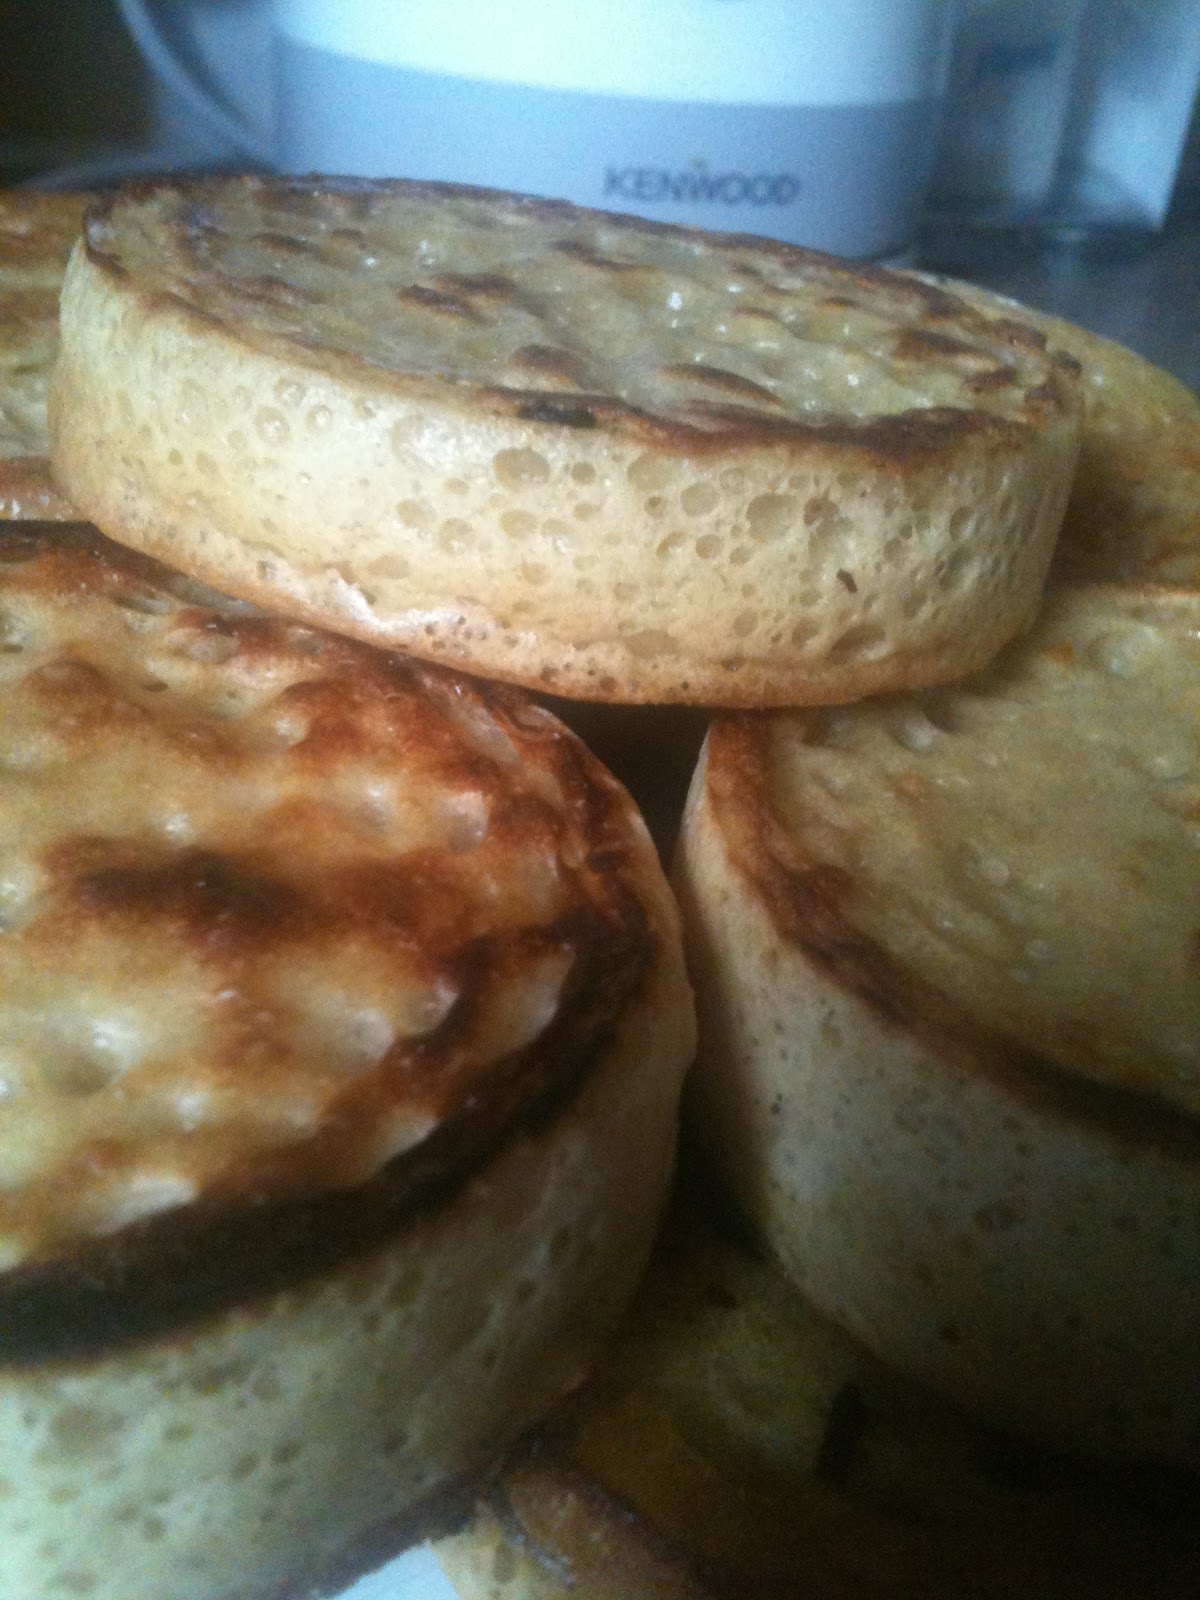
Crumpets
were a nice change to bake! Very different from all the recipes, as
this is a batter rather than a dough. Though in this recipe there is
probably double the amount of yeast used than in normal bread and
you can really tell from smell and how much it rises!
It's
a really quick (well, 2hrs) and fun recipe, when reading about making
Crumpets, it looks scary but it's not too much of a change to making
Pancakes! This recipe from Paul Hollywood's book is in the April
edition of delicious. magazine as it's a baking special!
So
the recipe starts like a normal bread recipe with the flour and
yeast, the salt is added in later. You heat the milk up a little and
then add that into the water then beat into the flour and yeast
mixture until it makes a nice smooth batter, a nice change from
kneading!

Once
you've made the batter you then have to leave for 2 hours and it's so
cool how it rises, I loved it! It was sticking to the cling film in
the end there was no room for it to rise! It's so sad as once this
process is over you then have to beat the salt and bicarbonate of
soda into the mixture so then it all floats back to original batter
size but you can really tell it is a lot more sponge like than
before! Once you've beaten these in, leave to rest for a further 10
minutes.
Then
I finally got to use my crumpet rings, on a heated pan, place them
down and pour the batter filling the rings till about half way. You
then leave them to cook (or bake?!) for around 6 minutes.

Once
the bottom of the crumpet is cooked, it is then time to slide the
ring off and flip (not like a pancake though) on the other side but
this time for only 2 minutes. This part took ages as I only had 2
rings and each crumpet takes 10 minutes each so I think I was out
there for about an hour making over 15 of them!
When
they are all baked you can either eat them straight away or leave
them to cool so you can toast them later on!
 Reviews?
I haven't had a proper opinion yet as we might have them for
breakfast tomorrow! Alice tried one and said it was nice, though she
didn't eat all of it – hmm!
Reviews?
I haven't had a proper opinion yet as we might have them for
breakfast tomorrow! Alice tried one and said it was nice, though she
didn't eat all of it – hmm!
Note: I just want to add that the packet mix in the picture is not mine, would never use one of those! :P It's Alice's as she is useless at baking! haha